v0.5.20 AUv3 Instrument Xcode Project Export
Posted: Wed Aug 05, 2020 4:54 pm
This version is all about exporting an AUv3 Instrument Xcode Project ( Effects, Generators and Midi Effects will come later ).
Here's the TestFlight public link:
TestFlight v0.5.27 for iPadOS
Testing this version is meant for advanced users from aspiring Audio Programmers to experienced AUv3 Developers.
When this feature is complete and working well, the objective is to enable non-programmers to create software musical instruments. For now, seeing the generated code and debug features might just scare them away from VisualSwift. So if you're more of a musician than a coder please be patient and come back later.
I hope this feature will also be useful to Audio Programmers as they'll be able to quickly prototype and run audio synthesis ideas and also maybe use the generated Xcode project as a starting template for their own code. The Xcode generated code is a bit untidy at the moment, some features are not implemented yet like Factory Presets, providing the correct Parameter units etc.
Following is a description of how to test this feature, if you find issues on the way ( you probably will ) or have questions please leave them here in this thread.
1 - Enabling AUv3 Instrument Exporting
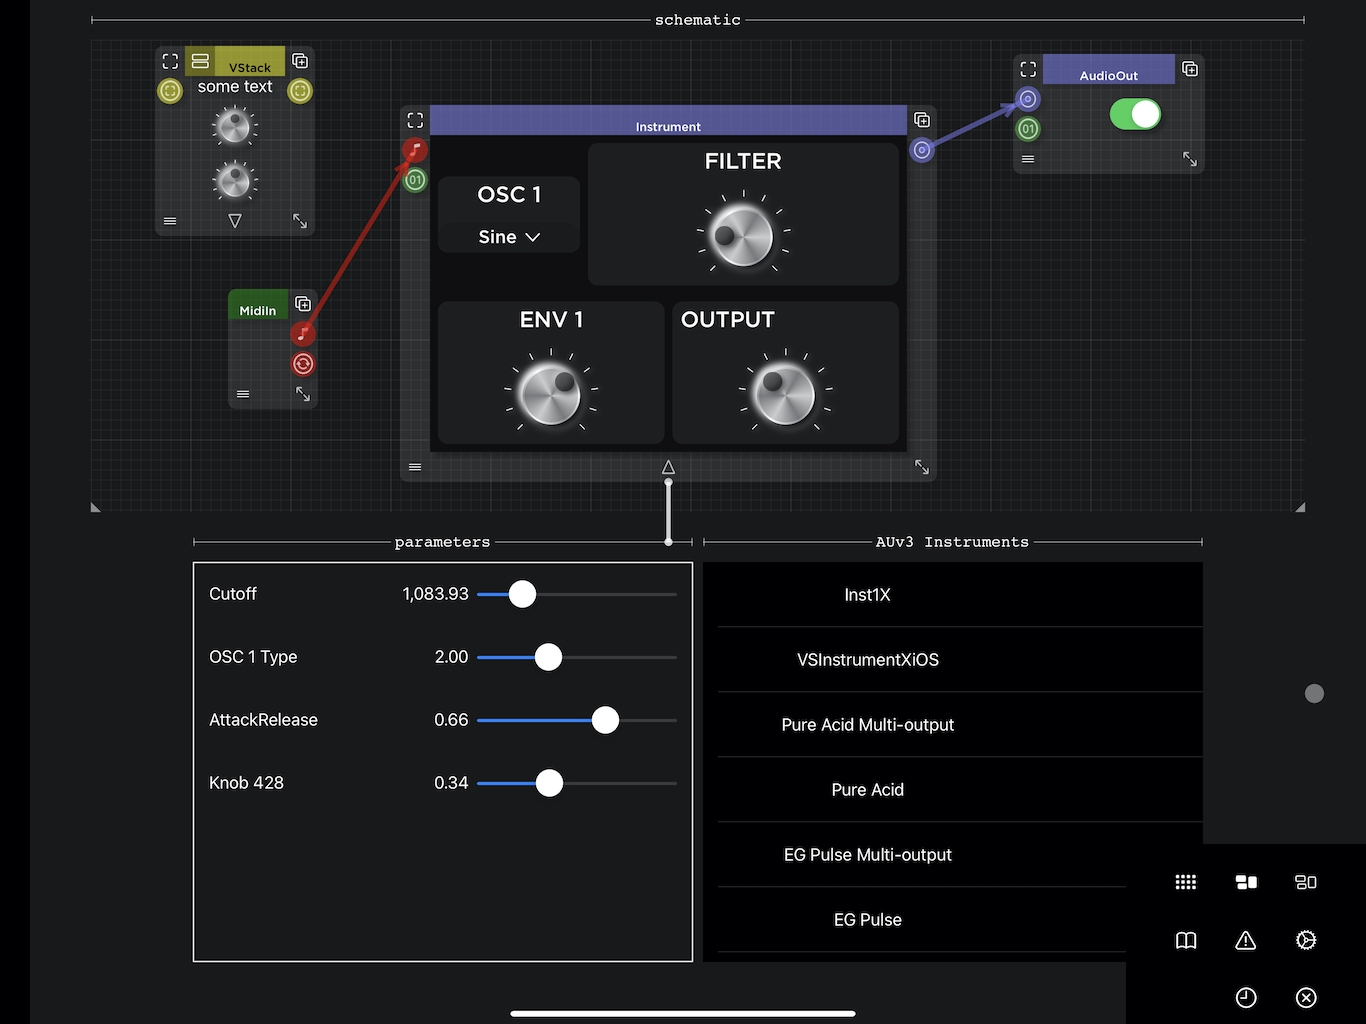
Enabling AUv3 Instrument Exporting is currently intentionally a bit hidden, following are the steps to enable it starting from an empty schematic, create the following:
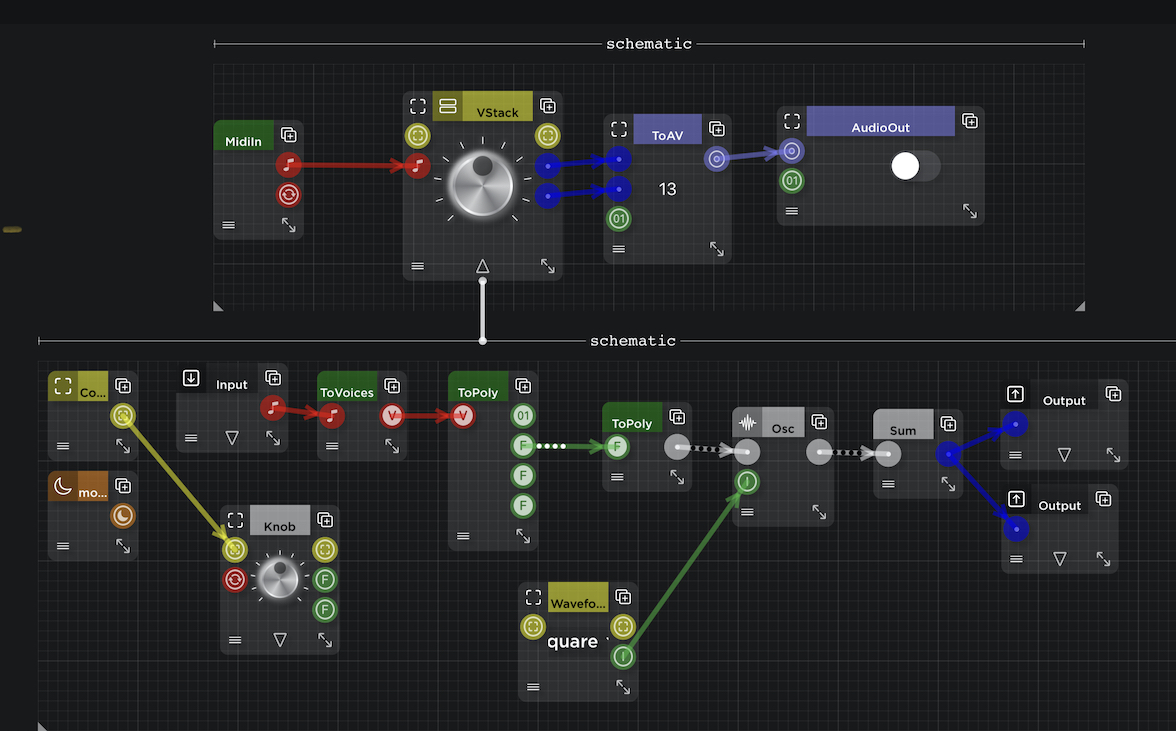
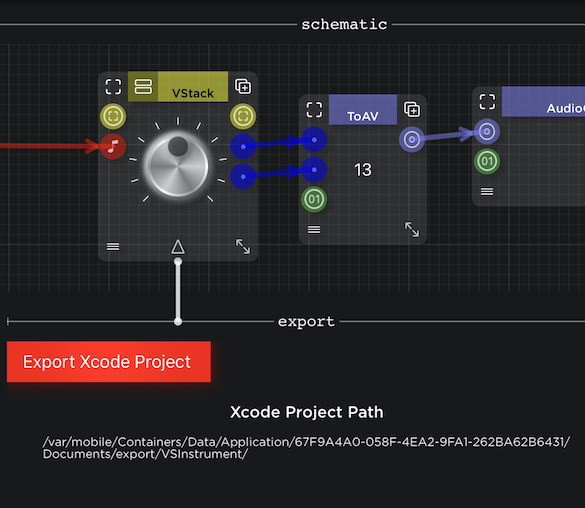
In the schematic above, the instrument to export is basically the VStack, as you can see it has one Midi (red ) input and two Mono ( blue ) outputs. When you have a VStack with 1 Midi input and 2 Mono outputs, the next step is to switch on the Exportable toggle switch as shown below. To see the Exporting features you also have to close the project with the toggle switch on and open it again, you should see the following:
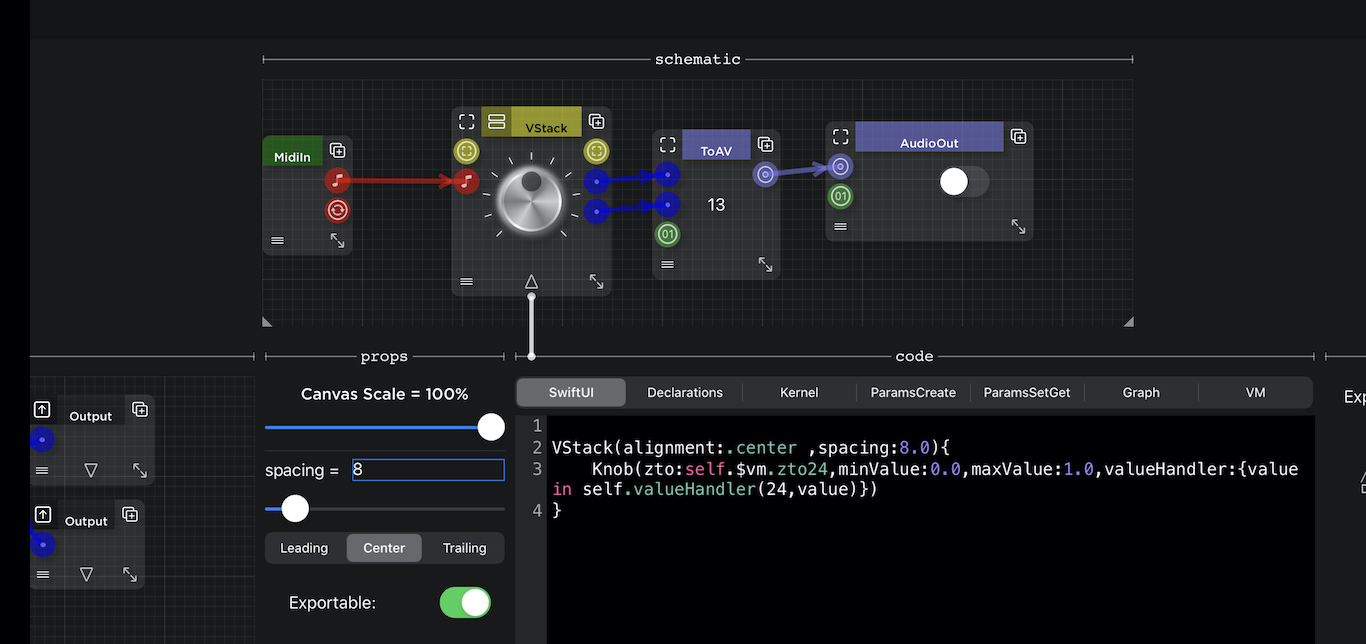
You should now see the "code" panel and the "export" panel further to the right.
The code panel has several tabs which I will explain, they are: SwiftUI, Declarations, Kernel, ParamsCreate, ParamsSetGet, Graph and VM.
It is not necessary to understand the generated code and you could just press the Export Xcode Project, build it, and install your new AUv3 instrument on. your device . At the moment there could be some updating bugs so it is recommended that just before exporting you close the project and open it again.
The code panel is useful at the moment for troubleshooting and also as a tool to help developers.
Now for a quick explanation of what the generated code tabs mean:
2 - Generated Code Tabs
SwiftUI Tab
The SwiftUI generated code basically defines the GUI of the exported instrument. In the example above the SwiftUI code was very short with just a Knob but it can be a lot more complicated, following is an example of a slightly bigger UI code:
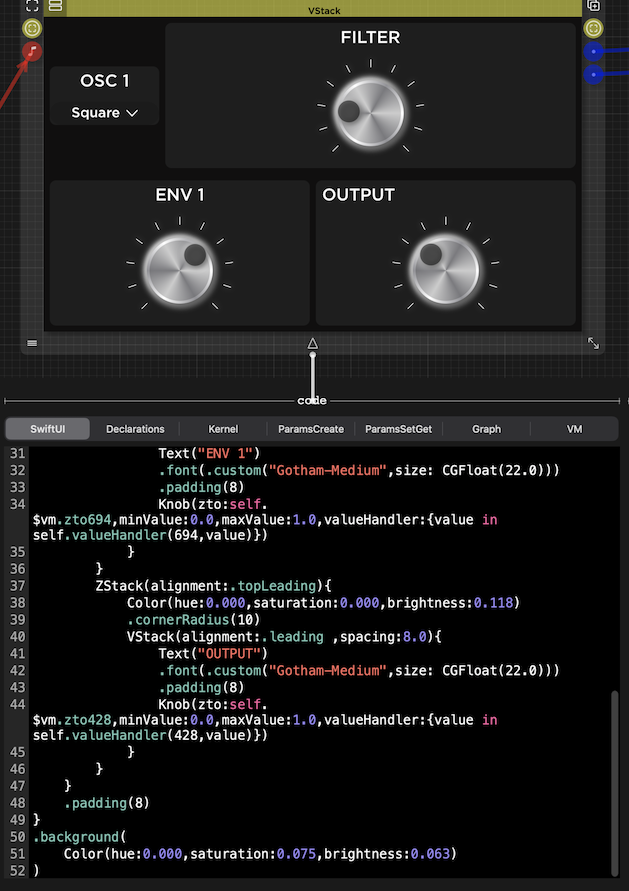
The code above corresponds to a hierarchical schematic where each module is a unit on it's own, like an Oscillator Module, an Envelope Module etc making it much easier to understand the graphical representation of that code.
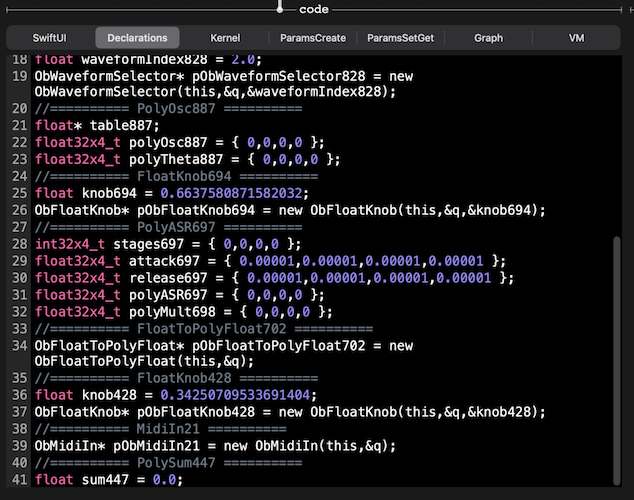
Declarations Tab
The declarations tab shows the variable declarations used in the kernel C code, below is an example:
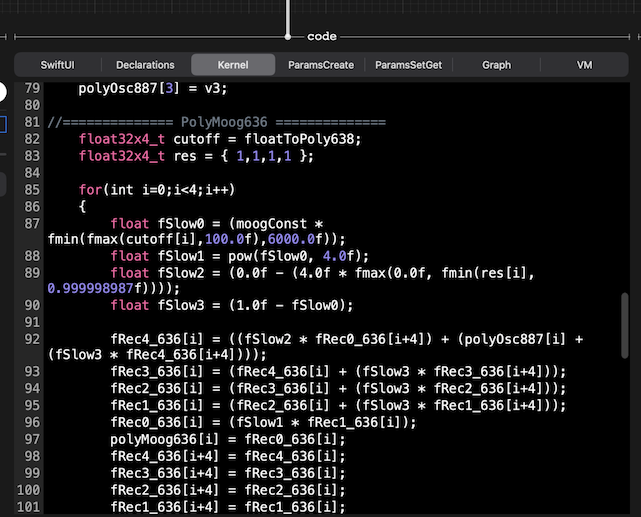
Kernel Tab
The Kernel Tab shows the generated low level DSP code, in the example below please note that although variables are prepared for SIMD vector instructions, currently the code processes one voice at a time. The idea is to get the code to run correctly without SIMD and later on refactor for performance.
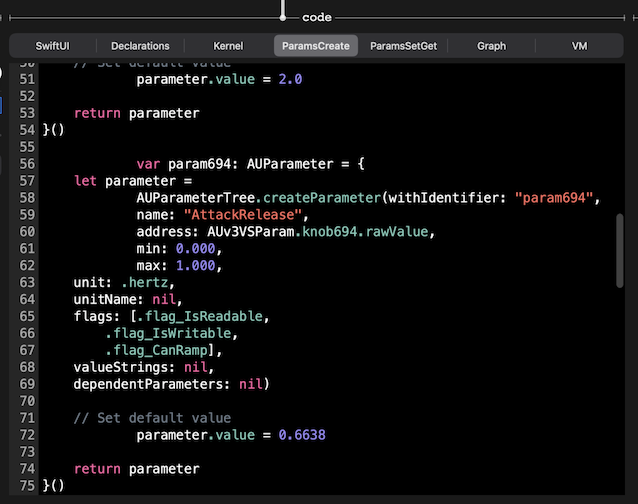
ParamsCreate Tab
The ParamsCreate code shows the generated code responsible for creating AU Parameters to be seen and controlled by a host. The parameter's unit value is not yet implemented and always shows as .hertz. At the moment there are two VisualSwift components that generate parameters, they are the Knob and the WaveformSelector.
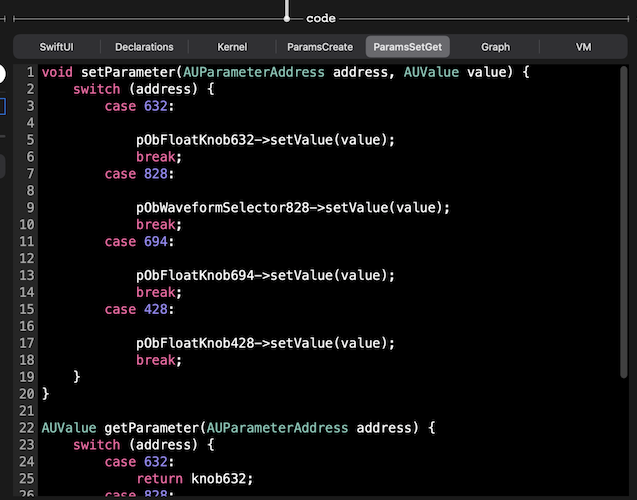
ParamsSetGet Tab
This code is responsible for plugging the AU parameters between the host and the instrument's GUI so that when the host changes a knob's value, for example, you should see the knob actually rotating.
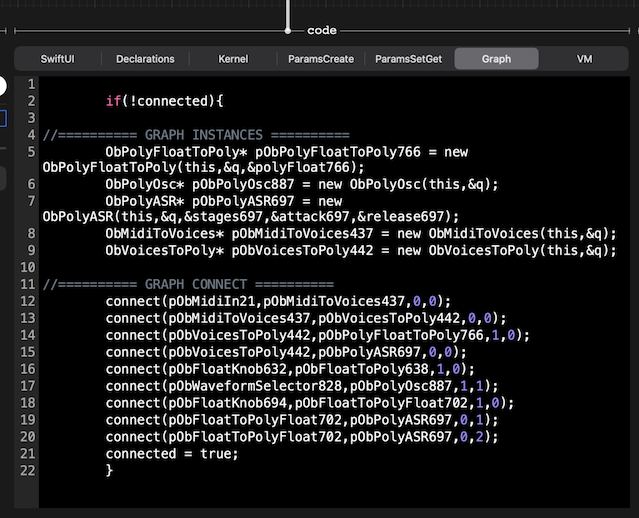
Graph Tab
The Graph generated code is used in the Kernel to connect timestamped event components following the VisualSwift's schematic although without being hierarchical, as this is generated code it doesn't need it.
VM Tab
The VM code generates an Observable object that is responsible for updating the GUI when a parameter changes.

3 - Exporting an Xcode AUv3 Instrument project
Having said all that, you can just ignore the section above and go straight for generating an Xcode project, building it and installing the AUv3 instrument on your device. After all, the whole point of this features is to avoid having to do all the work done by the code generator. If everything goes well and you're lucky not to come across any bugs, you should end up with your Instrument project avoiding many hours or even days of work.
To the right of the code panel, you should see the export panel with an "Export Xcode Project" button:
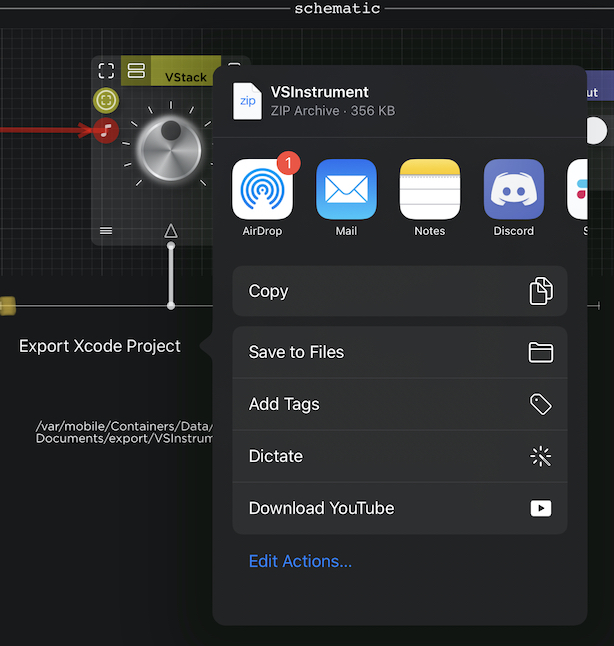
When you tap it, you should get a share sheet that allows you to AirDrop a VSInstrument.zip file to your Mac:
On your Mac, unzip the file and open the project in Xcode:
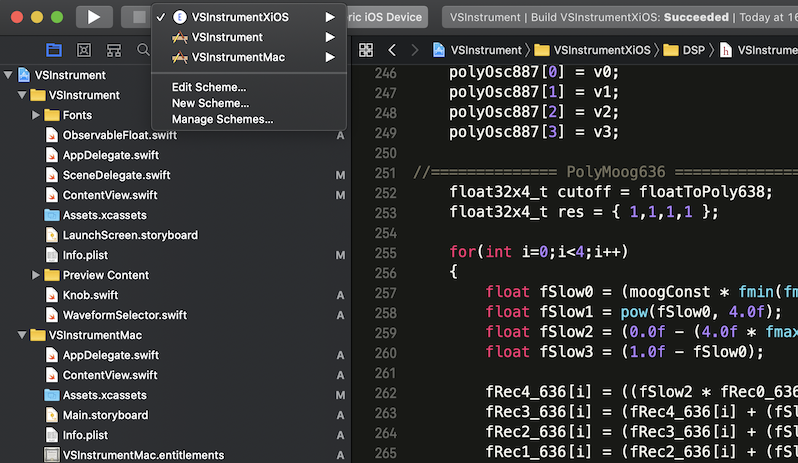
You should have 3 targets, one for iOS AUv3, one for Mac AUv3 and another for iOS Standalone app. Please note that only the iOS AUv3 is working at the moment. The standalone app should show the GUI but is not yet plugged to Midi input or Audio output. Once the iOS AUv3 target is tested and working well it should be quite easy to implement the other targets as the generated code should be nearly the same.
Build the project and run it on your iPad. It's quite useful to run it inside a host for debugging:
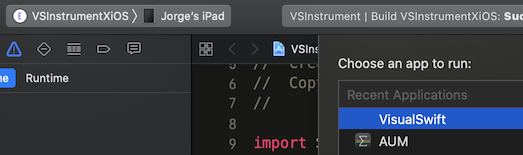
Here's a simple generated project running inside AUM:
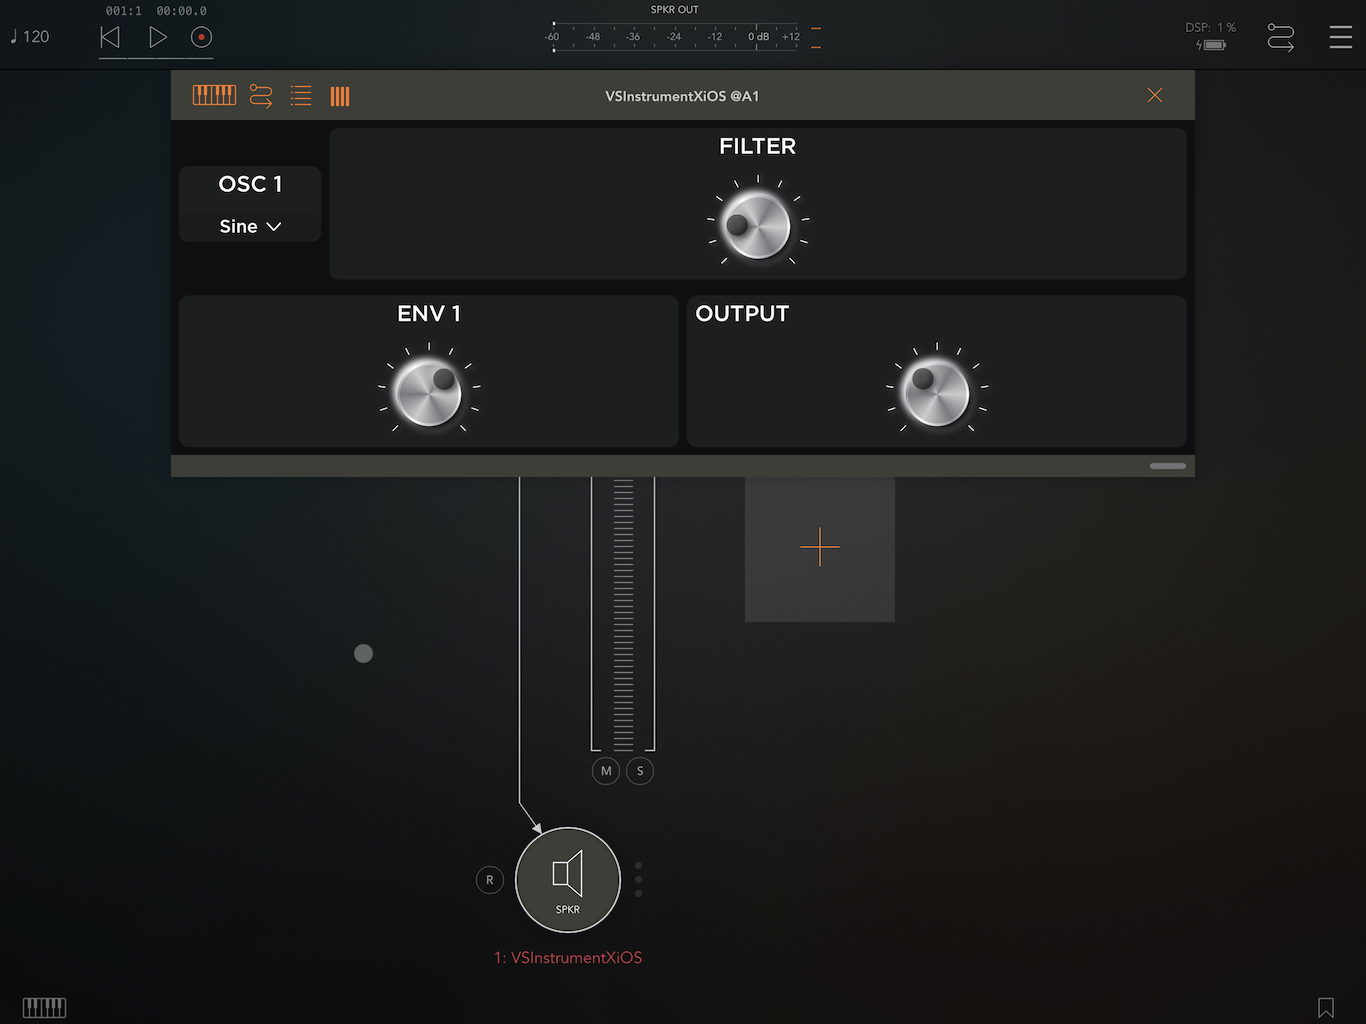
And don't forget that VisualSwift is also a host:
Here's the TestFlight public link:
TestFlight v0.5.27 for iPadOS
Testing this version is meant for advanced users from aspiring Audio Programmers to experienced AUv3 Developers.
When this feature is complete and working well, the objective is to enable non-programmers to create software musical instruments. For now, seeing the generated code and debug features might just scare them away from VisualSwift. So if you're more of a musician than a coder please be patient and come back later.
I hope this feature will also be useful to Audio Programmers as they'll be able to quickly prototype and run audio synthesis ideas and also maybe use the generated Xcode project as a starting template for their own code. The Xcode generated code is a bit untidy at the moment, some features are not implemented yet like Factory Presets, providing the correct Parameter units etc.
Following is a description of how to test this feature, if you find issues on the way ( you probably will ) or have questions please leave them here in this thread.
1 - Enabling AUv3 Instrument Exporting
Enabling AUv3 Instrument Exporting is currently intentionally a bit hidden, following are the steps to enable it starting from an empty schematic, create the following:
In the schematic above, the instrument to export is basically the VStack, as you can see it has one Midi (red ) input and two Mono ( blue ) outputs. When you have a VStack with 1 Midi input and 2 Mono outputs, the next step is to switch on the Exportable toggle switch as shown below. To see the Exporting features you also have to close the project with the toggle switch on and open it again, you should see the following:
You should now see the "code" panel and the "export" panel further to the right.
The code panel has several tabs which I will explain, they are: SwiftUI, Declarations, Kernel, ParamsCreate, ParamsSetGet, Graph and VM.
It is not necessary to understand the generated code and you could just press the Export Xcode Project, build it, and install your new AUv3 instrument on. your device . At the moment there could be some updating bugs so it is recommended that just before exporting you close the project and open it again.
The code panel is useful at the moment for troubleshooting and also as a tool to help developers.
Now for a quick explanation of what the generated code tabs mean:
2 - Generated Code Tabs
SwiftUI Tab
The SwiftUI generated code basically defines the GUI of the exported instrument. In the example above the SwiftUI code was very short with just a Knob but it can be a lot more complicated, following is an example of a slightly bigger UI code:
The code above corresponds to a hierarchical schematic where each module is a unit on it's own, like an Oscillator Module, an Envelope Module etc making it much easier to understand the graphical representation of that code.
Declarations Tab
The declarations tab shows the variable declarations used in the kernel C code, below is an example:
Kernel Tab
The Kernel Tab shows the generated low level DSP code, in the example below please note that although variables are prepared for SIMD vector instructions, currently the code processes one voice at a time. The idea is to get the code to run correctly without SIMD and later on refactor for performance.
ParamsCreate Tab
The ParamsCreate code shows the generated code responsible for creating AU Parameters to be seen and controlled by a host. The parameter's unit value is not yet implemented and always shows as .hertz. At the moment there are two VisualSwift components that generate parameters, they are the Knob and the WaveformSelector.
ParamsSetGet Tab
This code is responsible for plugging the AU parameters between the host and the instrument's GUI so that when the host changes a knob's value, for example, you should see the knob actually rotating.
Graph Tab
The Graph generated code is used in the Kernel to connect timestamped event components following the VisualSwift's schematic although without being hierarchical, as this is generated code it doesn't need it.
VM Tab
The VM code generates an Observable object that is responsible for updating the GUI when a parameter changes.
3 - Exporting an Xcode AUv3 Instrument project
Having said all that, you can just ignore the section above and go straight for generating an Xcode project, building it and installing the AUv3 instrument on your device. After all, the whole point of this features is to avoid having to do all the work done by the code generator. If everything goes well and you're lucky not to come across any bugs, you should end up with your Instrument project avoiding many hours or even days of work.
To the right of the code panel, you should see the export panel with an "Export Xcode Project" button:
When you tap it, you should get a share sheet that allows you to AirDrop a VSInstrument.zip file to your Mac:
On your Mac, unzip the file and open the project in Xcode:
You should have 3 targets, one for iOS AUv3, one for Mac AUv3 and another for iOS Standalone app. Please note that only the iOS AUv3 is working at the moment. The standalone app should show the GUI but is not yet plugged to Midi input or Audio output. Once the iOS AUv3 target is tested and working well it should be quite easy to implement the other targets as the generated code should be nearly the same.
Build the project and run it on your iPad. It's quite useful to run it inside a host for debugging:
Here's a simple generated project running inside AUM:
And don't forget that VisualSwift is also a host: